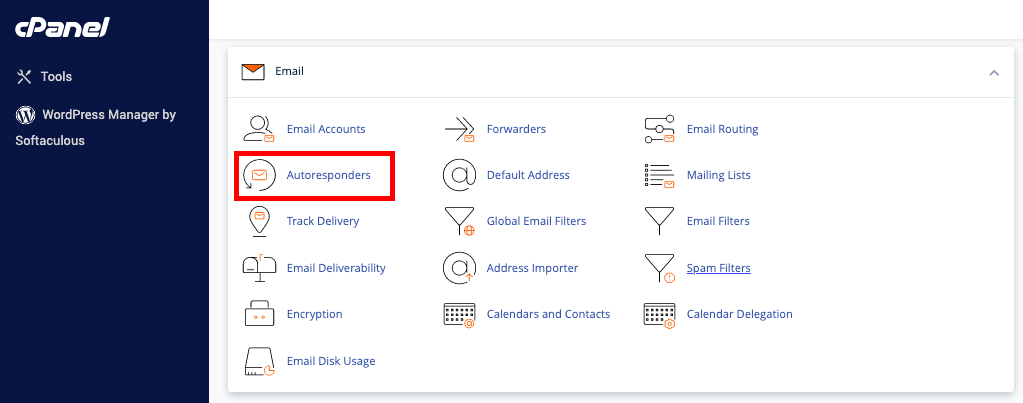
Autoresponder is a computer program that answers the emails it receives automatically. There are many Autoresponders out there, and some of them are easy to use, while others are more complex. This article will go over the steps you need to take to set up your Autoresponder through your cPanel.A cPanel is a control panel that enables you to access a set of different tools so that you can modify your website and its settings. Through the cPanel, you decide what your website will look like to the customers or the “end users,” and you have complete control over a myriad of actions. The cPanel dashboard is praised for being extremely user-friendly and for allowing everyone, including non-professionals, for doing as they please with their sites in a simple, straightforward manner.So, with all of this in mind, let’s see what you need to do in order to configure Autoresponder for your email account via your cPanel, and where you can find what you need to complete this process.First, you need to log in to your cPanel account. After you have done that, look for the “Email” option and select the “Autoresponders” tool. This will redirect you to another page, where the button responsible for adding new Autoresponders is located and also shows all your existing autoresponders.
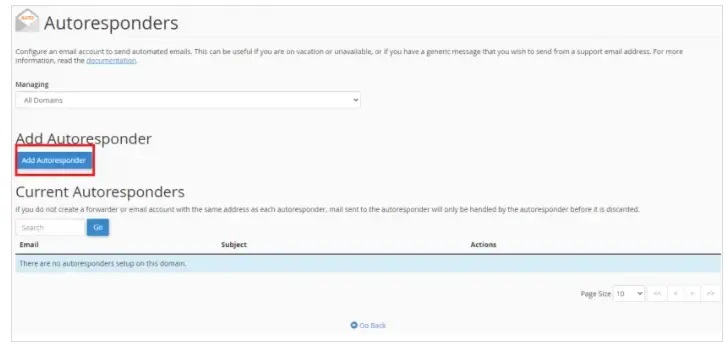
To set up a new autoresponder for your email account, you need to click on the “Add Autoresponder” button.
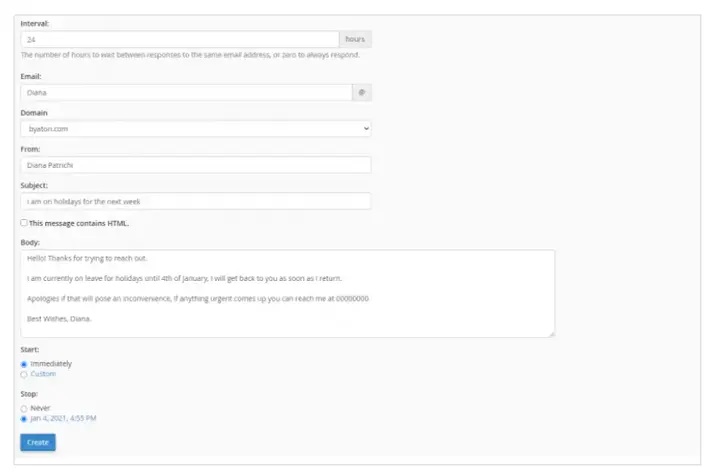
After you click this, many different settings will pop up on the screen for you to configure. Let’s break down what they do:
The "Interval" setting refers to the amount of time/hours the Autoresponder should let pass between responding to the same email address. Basically, this setting determines how often a message should be sent to the same sender when one person sends you an email several times.In the "Email" setting, you need to type out your email address. In the "From" setting, you need to put in from whom the message is, so you either put in your name or someone else's, depending on what you want.In the "Subject" set, you put in the subject of the automated email that the Autoresponder would send out. For instance, "In a meeting."In the "Body" setting, you should type out the automated message's content. For this, you can make a custom HTML body that can have various links, images, etc., in them. Usually, people put information like when they are back from a holiday in this setting.The last two settings, the "Stay" and "Stop" boxes, are used to set up the time when the Autoresponder should begin with responding, and it should automatically stop. This means that you will not have to turn it on and off by yourself manually.
Was this page helpful?
{"docsConfig":{"theme":"mint","$schema":"https://mintlify.com/docs.json","name":"Verpex","colors":{"primary":"#0D493D","light":"#2E8B6F","dark":"#0D493D"},"logo":{"light":"https://mintcdn.com/verpex/FWtFWwUhzgWf6GGA/logo/light.svg?fit=max\u0026auto=format\u0026n=FWtFWwUhzgWf6GGA\u0026q=85\u0026s=8af3ef8f5d76c39ae3e0a2a156a903f0","dark":"https://mintcdn.com/verpex/FWtFWwUhzgWf6GGA/logo/dark.svg?fit=max\u0026auto=format\u0026n=FWtFWwUhzgWf6GGA\u0026q=85\u0026s=f8bfc172b686d384422089772e217453"},"favicon":"https://mintcdn.com/verpex/BNJu4Bqg4Kw8QpuL/favicon.svg?fit=max\u0026auto=format\u0026n=BNJu4Bqg4Kw8QpuL\u0026q=85\u0026s=a7f204539f55bc68cc35751017e8192a","styling":{"latex":true},"navigation":{"pages":[]}},"deployment":{"deploymentMetadataValue":{"subdomain":"verpex","hasAudioNarration":false,"actualSubdomain":"verpex","customDomains":["kb.verpex.com"],"gitSource":{"type":"github","owner":"panaras10","repo":"verpexknowledgebase","deployBranch":"v1.0","contentDirectory":"","isPrivate":true,"mountPath":"","label":""},"chroma":{"collectionId":"ab8b0982-8a81-4d57-ab68-aabec8494702","liveDeploymentHistoryId":"6ac8a2f81ca625521b43739e","schemaVersion":"v3","latestBuiltDeploymentHistoryId":"6ac8a2f81ca625521b43739e"},"feedback":{"thumbs":true},"entitlements":{},"buildId":"6ac8a2f81ca625521b43739e","clientVersion":"0.0.3908","searchFilterCounts":[{"language":"default","tag":"cPanel Web Hosting","count":83},{"language":"default","tag":"Domain Names","count":33},{"language":"default","tag":"Accounts and Billing","count":30},{"language":"default","tag":"WordPress","count":29},{"language":"default","tag":"Emails","count":27},{"language":"default","tag":"Network and Technology","count":23},{"language":"default","tag":"Reseller Hosting","count":20},{"language":"default","tag":"Enhance Control Panel","count":17},{"language":"default","tag":"Domains \u0026 DNS in cPanel","count":13},{"language":"default","tag":"Software \u0026 Development","count":13}]},"assistantConfig":{"enableAskAiButton":false,"enableStarterQuestions":false,"enableContextualStarterQuestions":false,"enableAskAiSearchBar":true},"hasChatPermissions":false,"hasWebMcpPermissions":false,"toggles":[{"name":"kill-isr","enabled":true,"variant":{"name":"disabled","enabled":false,"feature_enabled":true},"impressionData":false},{"name":"agent-mintlify-slack","enabled":true,"variant":{"name":"disabled","enabled":false,"feature_enabled":true},"impressionData":false},{"name":"editor-v7-file-tree","enabled":true,"variant":{"name":"disabled","enabled":false,"feature_enabled":true},"impressionData":false},{"name":"agent-integrations-settings","enabled":true,"variant":{"name":"disabled","enabled":false,"feature_enabled":true},"impressionData":false},{"name":"automations-pr-grouping","enabled":true,"variant":{"name":"disabled","enabled":false,"feature_enabled":true},"impressionData":false},{"name":"custom-prefix","enabled":true,"variant":{"name":"disabled","enabled":false,"feature_enabled":true},"impressionData":false},{"name":"analytics-v7","enabled":true,"variant":{"name":"disabled","enabled":false,"feature_enabled":true},"impressionData":false},{"name":"user-flows-analytics","enabled":true,"variant":{"name":"disabled","enabled":false,"feature_enabled":true},"impressionData":false},{"name":"no-publish-flow","enabled":true,"variant":{"name":"disabled","enabled":false,"feature_enabled":true},"impressionData":false},{"name":"workos-onboarding","enabled":true,"variant":{"name":"disabled","enabled":false,"feature_enabled":true},"impressionData":false},{"name":"llms-txt-v2","enabled":true,"variant":{"name":"disabled","enabled":false,"feature_enabled":true},"impressionData":false},{"name":"pause-universal-search-reconcile","enabled":true,"variant":{"name":"disabled","enabled":false,"feature_enabled":true},"impressionData":false},{"name":"snapshot-serving-live","enabled":true,"variant":{"name":"disabled","enabled":false,"feature_enabled":true},"impressionData":false},{"name":"stripTemperatureMiddleware","enabled":true,"variant":{"name":"disabled","enabled":false,"feature_enabled":true},"impressionData":false},{"name":"per-site-search-delta","enabled":true,"variant":{"name":"disabled","enabled":false,"feature_enabled":true},"impressionData":false},{"name":"support-platform-pylon-zendesk","enabled":true,"variant":{"name":"disabled","enabled":false,"feature_enabled":true},"impressionData":false},{"name":"editor-branches-v2-autocommit","enabled":true,"variant":{"name":"disabled","enabled":false,"feature_enabled":true},"impressionData":false},{"name":"editor-branches-v2","enabled":true,"variant":{"name":"disabled","enabled":false,"feature_enabled":true},"impressionData":false},{"name":"snapshot-serving","enabled":true,"variant":{"name":"disabled","enabled":false,"feature_enabled":true},"impressionData":false},{"name":"instant-rollback","enabled":true,"variant":{"name":"disabled","enabled":false,"feature_enabled":true},"impressionData":false},{"name":"granular-notifications-server","enabled":true,"variant":{"name":"disabled","enabled":false,"feature_enabled":true},"impressionData":false},{"name":"granular-notifications","enabled":true,"variant":{"name":"disabled","enabled":false,"feature_enabled":true},"impressionData":false},{"name":"editor-private-page-search","enabled":true,"variant":{"name":"disabled","enabled":false,"feature_enabled":true},"impressionData":false},{"name":"automations-fable","enabled":true,"variant":{"name":"disabled","enabled":false,"feature_enabled":true},"impressionData":false},{"name":"fixed-ai-action-pricing","enabled":true,"variant":{"name":"disabled","enabled":false,"feature_enabled":true},"impressionData":false},{"name":"automation-resolve-merge-conflict","enabled":true,"variant":{"name":"disabled","enabled":false,"feature_enabled":true},"impressionData":false},{"name":"scoped-publishing","enabled":true,"variant":{"name":"disabled","enabled":false,"feature_enabled":true},"impressionData":false},{"name":"mintql","enabled":true,"variant":{"name":"disabled","enabled":false,"feature_enabled":true},"impressionData":false},{"name":"page-level-analytics","enabled":true,"variant":{"name":"disabled","enabled":false,"feature_enabled":true},"impressionData":false},{"name":"teamspace","enabled":true,"variant":{"name":"disabled","enabled":false,"feature_enabled":true},"impressionData":false},{"name":"editor-version-history-v2","enabled":true,"variant":{"name":"disabled","enabled":false,"feature_enabled":true},"impressionData":false},{"name":"vite-origin","enabled":true,"variant":{"name":"disabled","enabled":false,"feature_enabled":true},"impressionData":false},{"name":"editor-nav-generations","enabled":true,"variant":{"name":"disabled","enabled":false,"feature_enabled":true},"impressionData":false},{"name":"billing-page-v2","enabled":true,"variant":{"name":"disabled","enabled":false,"feature_enabled":true},"impressionData":false},{"name":"workspace-projects","enabled":true,"variant":{"name":"disabled","enabled":false,"feature_enabled":true},"impressionData":false},{"name":"assistant-v5","enabled":true,"variant":{"name":"disabled","enabled":false,"feature_enabled":true},"impressionData":false},{"name":"byok-sep-25","enabled":true,"variant":{"name":"disabled","enabled":false,"feature_enabled":true},"impressionData":false},{"name":"fork-pr-previews","enabled":true,"variant":{"name":"disabled","enabled":false,"feature_enabled":true},"impressionData":false},{"name":"revalidation-jwt","enabled":true,"variant":{"name":"disabled","enabled":false,"feature_enabled":true},"impressionData":false},{"name":"editor-agent-model-picker","enabled":true,"variant":{"name":"disabled","enabled":false,"feature_enabled":true},"impressionData":false},{"name":"client-snapshot-docs-config","enabled":true,"variant":{"name":"disabled","enabled":false,"feature_enabled":true},"impressionData":false},{"name":"hobby-abuse-scan","enabled":true,"variant":{"name":"disabled","enabled":false,"feature_enabled":true},"impressionData":false},{"name":"dashboard-inbox","enabled":true,"variant":{"name":"disabled","enabled":false,"feature_enabled":true},"impressionData":false}],"isAtlas":false,"googleFontsInlined":false},"customCss":[],"page":{"pagePath":"emails/configuring-autoresponder-for-your-email-account","slug":"/emails/configuring-autoresponder-for-your-email-account","pageMetadata":{"title":"Configuring Autoresponder for your Email Account","description":null,"href":"/emails/configuring-autoresponder-for-your-email-account"},"pageType":"default","mdx":{"mdxSource":{"compiledSource":"\"use strict\";const{Fragment:_Fragment,jsx:_jsx,jsxs:_jsxs}=arguments[0];const{useMDXComponents:_provideComponents}=arguments[0];function _createMdxContent(props){const _components={code:`code`,img:`img`,p:`p`,pre:`pre`,span:`span`,..._provideComponents(),...props.components},{CodeBlock,Frame}=_components;if(!CodeBlock)_missingMdxReference(`CodeBlock`,true);if(!Frame)_missingMdxReference(`Frame`,true);return _jsxs(_Fragment,{children:[_jsx(_components.p,{children:`Autoresponder is a computer program that answers the emails it receives automatically. There are many Autoresponders out there, and some of them are easy to use, while others are more complex. This article will go over the steps you need to take to set up your Autoresponder through your cPanel.`}),`\n`,_jsx(_components.p,{children:`A cPanel is a control panel that enables you to access a set of different tools so that you can modify your website and its settings. Through the cPanel, you decide what your website will look like to the customers or the “end users,” and you have complete control over a myriad of actions. The cPanel dashboard is praised for being extremely user-friendly and for allowing everyone, including non-professionals, for doing as they please with their sites in a simple, straightforward manner.`}),`\n`,_jsx(_components.p,{children:`So, with all of this in mind, let’s see what you need to do in order to configure Autoresponder for your email account via your cPanel, and where you can find what you need to complete this process.`}),`\n`,_jsx(_components.p,{children:`First, you need to log in to your cPanel account. After you have done that, look for the “Email” option and select the “Autoresponders” tool. This will redirect you to another page, where the button responsible for adding new Autoresponders is located and also shows all your existing autoresponders.`}),`\n`,_jsx(Frame,{children:_jsx(_components.p,{children:_jsx(_components.img,{src:`https://files.readme.io/0e563b2-Screen_Shot_2022-09-01_at_08.35.10.png`,alt:``,title:`Screen Shot 2022-09-01 at 08.35.10.png`})})}),`\n`,_jsx(_components.p,{children:`To set up a new autoresponder for your email account, you need to click on the “Add Autoresponder” button.`}),`\n`,_jsx(Frame,{children:_jsx(_components.p,{children:_jsx(_components.img,{src:`https://files.readme.io/f071679-Image2.jpg`,alt:``,title:`Image2.jpg`})})}),`\n`,_jsx(_components.p,{children:`After you click this, many different settings will pop up on the screen for you to configure. Let’s break down what they do:`}),`\n`,_jsx(CodeBlock,{numberOfLines:`10`,language:`text`,children:_jsx(_components.pre,{className:`shiki shiki-themes github-light-default dark-plus`,style:{backgroundColor:`#ffffff`,\"--shiki-dark-bg\":`#0B0C0E`,color:`#1f2328`,\"--shiki-dark\":`#D4D4D4`},language:`text`,children:_jsxs(_components.code,{language:`text`,numberOfLines:`10`,children:[_jsx(_components.span,{className:`line`,children:_jsx(_components.span,{children:`The \"Interval\" setting refers to the amount of time/hours the Autoresponder should let pass between responding to the same email address. Basically, this setting determines how often a message should be sent to the same sender when one person sends you an email several times.`})}),`\n`,_jsx(_components.span,{className:`line`,children:_jsx(_components.span,{})}),`\n`,_jsx(_components.span,{className:`line`,children:_jsx(_components.span,{children:`In the \"Email\" setting, you need to type out your email address. In the \"From\" setting, you need to put in from whom the message is, so you either put in your name or someone else's, depending on what you want.`})}),`\n`,_jsx(_components.span,{className:`line`,children:_jsx(_components.span,{})}),`\n`,_jsx(_components.span,{className:`line`,children:_jsx(_components.span,{children:`In the \"Subject\" set, you put in the subject of the automated email that the Autoresponder would send out. For instance, \"In a meeting.\"`})}),`\n`,_jsx(_components.span,{className:`line`,children:_jsx(_components.span,{})}),`\n`,_jsx(_components.span,{className:`line`,children:_jsx(_components.span,{children:`In the \"Body\" setting, you should type out the automated message's content. For this, you can make a custom HTML body that can have various links, images, etc., in them. Usually, people put information like when they are back from a holiday in this setting.`})}),`\n`,_jsx(_components.span,{className:`line`,children:_jsx(_components.span,{})}),`\n`,_jsx(_components.span,{className:`line`,children:_jsx(_components.span,{children:`The last two settings, the \"Stay\" and \"Stop\" boxes, are used to set up the time when the Autoresponder should begin with responding, and it should automatically stop. This means that you will not have to turn it on and off by yourself manually.`})}),`\n`,_jsx(_components.span,{className:`line`,children:_jsx(_components.span,{})})]})})}),`\n`,_jsx(Frame,{children:_jsx(_components.p,{children:_jsx(_components.img,{src:`https://files.readme.io/896d36d-Image3.jpg`,alt:``,title:`Image3.jpg`})})})]})}function MDXContent(props={}){const{wrapper:MDXLayout}={..._provideComponents(),...props.components};return MDXLayout?_jsx(MDXLayout,{...props,children:_jsx(_createMdxContent,{...props})}):_createMdxContent(props)}return{default:MDXContent};function _missingMdxReference(id,component){throw new Error(`Expected `+(component?`component`:`object`)+\" `\"+id+\"` to be defined: you likely forgot to import, pass, or provide it.\")}","frontmatter":{},"scope":{"config":{},"pageMetadata":{"title":"Configuring Autoresponder for your Email Account","description":null,"href":"/emails/configuring-autoresponder-for-your-email-account"}}},"mdxSourceWithNoJs":null},"mdxExtracts":{"tableOfContents":[],"codeExamples":{}},"jsLinks":[],"subdomain":"verpex","siteName":"Verpex","title":"Configuring Autoresponder for your Email Account - Verpex","navMaps":{"firstHrefInVersion":{},"firstHrefInLanguage":{}},"lastModified":"2026-09-09T05:49:39.805Z","originalFileLocation":"emails/configuring-autoresponder-for-your-email-account.mdx"},"headHtml":"\u003cscript data-mint-head>(function(){var d=document.documentElement,p=null;if(!p){try{p=localStorage.getItem(\"isDarkMode\")}catch(e){}if(p==='true')p='dark';else if(p==='false')p='light';if(p!=='light'\u0026\u0026p!=='dark'\u0026\u0026p!=='system')p=\"system\"}var r=p==='system'?(matchMedia(\"(prefers-color-scheme: dark)\").matches?'dark':'light'):p;d.classList.remove(r==='dark'?'light':'dark');d.classList.add(r);d.setAttribute(\"data-theme-preference\",p)})();\u003c/script>\u003cmeta data-mint-head name=\"application-name\" content=\"Verpex\">\u003cmeta data-mint-head name=\"generator\" content=\"Mintlify\">\u003clink data-mint-head rel=\"icon\" type=\"image/png\" sizes=\"192x192\" href=\"/mintlify-assets/_mintlify/favicons/verpex/YUm2gCvnowuT7N9p/_generated/favicon/android-chrome-192x192.png\" media=\"(prefers-color-scheme: light)\">\u003clink data-mint-head rel=\"apple-touch-icon\" type=\"image/png\" sizes=\"180x180\" href=\"/mintlify-assets/_mintlify/favicons/verpex/YUm2gCvnowuT7N9p/_generated/favicon/apple-touch-icon.png\">\u003clink data-mint-head rel=\"icon\" type=\"image/png\" sizes=\"16x16\" href=\"/mintlify-assets/_mintlify/favicons/verpex/YUm2gCvnowuT7N9p/_generated/favicon/favicon-16x16.png\" media=\"(prefers-color-scheme: light)\">\u003clink data-mint-head rel=\"icon\" type=\"image/png\" sizes=\"32x32\" href=\"/mintlify-assets/_mintlify/favicons/verpex/YUm2gCvnowuT7N9p/_generated/favicon/favicon-32x32.png\" media=\"(prefers-color-scheme: light)\">\u003clink data-mint-head rel=\"shortcut icon\" type=\"image/x-icon\" href=\"/mintlify-assets/_mintlify/favicons/verpex/YUm2gCvnowuT7N9p/_generated/favicon/favicon.ico\" media=\"(prefers-color-scheme: light)\">\u003clink data-mint-head rel=\"icon\" type=\"image/png\" sizes=\"192x192\" href=\"/mintlify-assets/_mintlify/favicons/verpex/YUm2gCvnowuT7N9p/_generated/favicon-dark/android-chrome-192x192.png\" media=\"(prefers-color-scheme: dark)\">\u003clink data-mint-head rel=\"icon\" type=\"image/png\" sizes=\"16x16\" href=\"/mintlify-assets/_mintlify/favicons/verpex/YUm2gCvnowuT7N9p/_generated/favicon-dark/favicon-16x16.png\" media=\"(prefers-color-scheme: dark)\">\u003clink data-mint-head rel=\"icon\" type=\"image/png\" sizes=\"32x32\" href=\"/mintlify-assets/_mintlify/favicons/verpex/YUm2gCvnowuT7N9p/_generated/favicon-dark/favicon-32x32.png\" media=\"(prefers-color-scheme: dark)\">\u003clink data-mint-head rel=\"shortcut icon\" type=\"image/x-icon\" href=\"/mintlify-assets/_mintlify/favicons/verpex/YUm2gCvnowuT7N9p/_generated/favicon-dark/favicon.ico\" media=\"(prefers-color-scheme: dark)\">\u003cmeta data-mint-head property=\"og:title\" content=\"Configuring Autoresponder for your Email Account - Verpex\">\u003cmeta data-mint-head property=\"og:site_name\" content=\"Verpex\">\u003cmeta data-mint-head property=\"og:url\" content=\"https://kb.verpex.com/emails/configuring-autoresponder-for-your-email-account\">\u003cmeta data-mint-head property=\"og:type\" content=\"website\">\u003cmeta data-mint-head name=\"twitter:card\" content=\"summary_large_image\">\u003cmeta data-mint-head name=\"twitter:title\" content=\"Configuring Autoresponder for your Email Account - Verpex\">\u003cmeta data-mint-head name=\"msapplication-config\" content=\"/mintlify-assets/_mintlify/favicons/verpex/YUm2gCvnowuT7N9p/_generated/favicon/browserconfig.xml\">\u003cmeta data-mint-head name=\"apple-mobile-web-app-title\" content=\"Verpex\">\u003cmeta data-mint-head name=\"msapplication-TileColor\" content=\"#0D493D\">\u003clink data-mint-head rel=\"canonical\" href=\"https://kb.verpex.com/emails/configuring-autoresponder-for-your-email-account\">\u003clink data-mint-head rel=\"alternate\" type=\"application/xml\" href=\"/sitemap.xml\">\u003clink data-mint-head rel=\"alternate\" type=\"text/markdown\" href=\"/emails/configuring-autoresponder-for-your-email-account.md\">\u003cscript data-mint-head type=\"application/ld+json\">{\"@context\":\"https://schema.org\",\"@graph\":[{\"@type\":\"Organization\",\"@id\":\"https://kb.verpex.com/#organization\",\"name\":\"Verpex\",\"url\":\"https://kb.verpex.com\",\"logo\":{\"@type\":\"ImageObject\",\"url\":\"https://mintcdn.com/verpex/FWtFWwUhzgWf6GGA/logo/light.svg?fit=max\u0026auto=format\u0026n=FWtFWwUhzgWf6GGA\u0026q=85\u0026s=8af3ef8f5d76c39ae3e0a2a156a903f0\"}},{\"@type\":\"WebSite\",\"@id\":\"https://kb.verpex.com#website\",\"name\":\"Verpex\",\"url\":\"https://kb.verpex.com\",\"publisher\":{\"@id\":\"https://kb.verpex.com/#organization\"}},{\"@type\":\"WebPage\",\"@id\":\"https://kb.verpex.com/emails/configuring-autoresponder-for-your-email-account#webpage\",\"url\":\"https://kb.verpex.com/emails/configuring-autoresponder-for-your-email-account\",\"name\":\"Configuring Autoresponder for your Email Account\",\"dateModified\":\"2026-09-09T05:49:39.805Z\",\"isPartOf\":{\"@id\":\"https://kb.verpex.com#website\"},\"breadcrumb\":{\"@id\":\"https://kb.verpex.com/emails/configuring-autoresponder-for-your-email-account#breadcrumb\"}},{\"@type\":\"BreadcrumbList\",\"@id\":\"https://kb.verpex.com/emails/configuring-autoresponder-for-your-email-account#breadcrumb\",\"itemListElement\":[{\"@type\":\"ListItem\",\"position\":1,\"name\":\"Emails\",\"item\":\"https://kb.verpex.com/emails/email-overview\"},{\"@type\":\"ListItem\",\"position\":2,\"name\":\"Configuring Autoresponder for your Email Account\",\"item\":\"https://kb.verpex.com/emails/configuring-autoresponder-for-your-email-account\"}]},{\"@type\":[\"Article\",\"TechArticle\"],\"@id\":\"https://kb.verpex.com/emails/configuring-autoresponder-for-your-email-account#article\",\"headline\":\"Configuring Autoresponder for your Email Account\",\"name\":\"Configuring Autoresponder for your Email Account\",\"url\":\"https://kb.verpex.com/emails/configuring-autoresponder-for-your-email-account\",\"mainEntityOfPage\":{\"@id\":\"https://kb.verpex.com/emails/configuring-autoresponder-for-your-email-account#webpage\"},\"dateModified\":\"2026-09-09T05:49:39.805Z\",\"publisher\":{\"@id\":\"https://kb.verpex.com/#organization\"},\"isPartOf\":{\"@id\":\"https://kb.verpex.com#website\"}}]}\u003c/script>\u003cscript data-mint-head type=\"application/ld+json\">{\"@context\":\"https://schema.org\",\"@type\":\"WebSite\",\"name\":\"Verpex\",\"creator\":{\"@type\":\"Organization\",\"name\":\"Mintlify\",\"url\":\"https://mintlify.com\"}}\u003c/script>","siteName":"Verpex","nav":{"global":null,"pages":[{"group":"Getting Started","icon":"rocket","pages":[{"group":"Welcome to Verpex","pages":[{"title":"Getting Started with Verpex","href":"/docs/getting-started"},{"title":"How Long does it take to set up my Account?","href":"/docs/how-long-does-it-take-to-set-up-my-account"},{"title":"Order Your Hosting Account","href":"/docs/order-your-hosting-account"},{"title":"Web Hosting, Explained","href":"/docs/web-hosting-explained"},{"title":"Why Choose Verpex?","href":"/docs/why-choose-verpex"}]},{"group":"Getting Support","pages":[{"title":"How to Create and View Support Tickets","href":"/docs/how-to-create-and-view-support-tickets"},{"title":"What is a Support Pin?","href":"/docs/what-is-a-support-pin"}]},{"group":"Policies \u0026 Restrictions","pages":[{"title":"Account Closure","href":"/docs/account-closure"},{"title":"Banned Countries","href":"/docs/banned-countries"},{"title":"Can I Host Adult Content?","href":"/docs/can-you-host-adult-videoporn"},{"title":"Content Restrictions and DMCA Compliance","href":"/docs/content-restrictions-and-dmca-compliance"}]}]},{"group":"Moving to Verpex","icon":"truck","pages":[{"title":"How to Transfer my Hosting to Verpex","href":"/cpanel/how-to-transfer-my-hosting-to-verpex"},{"title":"Website Migration Process","href":"/moving/website-migration-process"},{"title":"Domain Transfers","href":"/moving/domain-transfers"},{"title":"Domain, Website, and Email Hosting: What's the Difference?","href":"/moving/whats-the-difference-between-a-domain-website-and-email-hosting"}]},{"group":"Accounts and Billing","icon":"credit-card","pages":[{"group":"Using Your Verpex Panel","pages":[{"title":"Using Your Verpex Panel","href":"/servers/using-your-verpex-panel"},{"title":"Accessing Your Account on the Hosting Panel","href":"/servers/accessing-your-account-on-the-hosting-panel"},{"title":"Managing Your Profile in the Hosting Panel","href":"/servers/managing-your-profile-in-the-hosting-panel"},{"title":"Managing Billing in the Hosting Panel","href":"/servers/managing-billing-in-the-hosting-panel"},{"title":"Viewing Your Support PIN","href":"/servers/viewing-your-support-pin"},{"title":"Working with Tickets in the Hosting Panel","href":"/servers/working-with-tickets-in-the-hosting-panel"},{"title":"Updating Your Account's Default Email Address","href":"/servers/updating-the-default-email-address-for-your-account"},{"title":"Viewing and Changing Shared Hosting Account Settings","href":"/servers/viewing-and-changing-settings-for-shared-hosting-accounts"},{"title":"Renewing a Domain","href":"/servers/renewing-a-domain"},{"title":"Managing Your Domain","href":"/servers/managing-your-domain"},{"title":"Requesting a Site Migration to Verpex","href":"/servers/requesting-site-migration-from-another-host-to-verpex"}]},{"title":"Clients Verpex Overview","href":"/billing/clients-verpex-overview"},{"title":"Support Team","href":"/billing/support-team"},{"title":"Countries with Potential Service Restrictions","href":"/billing/countries-with-potential-service-restrictions"},{"title":"Discounts and Promo Codes","href":"/billing/discounts-and-promo-codes"},{"title":"Enabling and Disabling Two-Factor Authentication (2FA)","href":"/billing/how-to-disable-2fa-authentication"},{"group":"Affiliate Programme","pages":[{"title":"Affiliate System","href":"/billing/affiliate-system"},{"title":"How to Use Verpex Affiliate System","href":"/billing/how-to-use-verpex-affiliate-system"}]},{"group":"Payments \u0026 Invoices","pages":[{"title":"Payment methods","href":"/billing/payment-methods"},{"title":"How to Change Payment Method","href":"/billing/how-to-change-payment-method"},{"title":"Adding or Removing a Payment Card","href":"/billing/how-do-i-addremove-a-payment-card-from-my-account"},{"title":"Why Was My Card Declined?","href":"/billing/why-was-my-card-declined"},{"title":"How to View Invoices","href":"/billing/how-to-view-invoices"},{"title":"Invoicing and Suspension","href":"/billing/invoicing-and-suspension"},{"title":"Paying for a Domain When You're Not the Registrant","href":"/billing/how-to-pay-for-a-domain-name-if-i-am-not-the-registrant"},{"title":"How To Add Credit To my Verpex Account","href":"/billing/how-to-add-credit-to-my-verpex-account"},{"title":"How To Apply my Credit on an Invoice","href":"/billing/how-to-apply-my-credit-on-an-invoice"}]},{"group":"Renewals, Cancellations \u0026 Refunds","pages":[{"title":"Automatic vs Manual Domain Renewals","href":"/billing/automatic-vs-manual-domain-renewals"},{"title":"Money-Back Guarantee","href":"/billing/money-back-guarantee"},{"title":"Cancellation","href":"/billing/cancellation"},{"title":"Cancellation and Refund","href":"/billing/cancellation-and-refund"}]}]},{"group":"Domain Names","icon":"globe","pages":[{"title":"How can I Register a Domain with Verpex?","href":"/domains/how-to-register-a-domain-name-with-verpex"},{"title":"Changing Your Main Domain","href":"/domains/changing-your-main-domain"},{"title":"Do We Still Need Whois Privacy Protection?","href":"/domains/do-we-still-need-whois-privacy-protection"},{"title":"Domain Verification Suspension","href":"/domains/domain-verification-suspension"},{"title":"Failed Domain Registration/Renewal","href":"/domains/failed-domain-registrationrenewal"},{"title":"Free Domain Offers","href":"/domains/free-domain"},{"title":"How can I Manage DNS on my Domain Through cPanel?","href":"/domains/how-can-i-manage-dns-on-my-domain-through-cpanel"},{"title":"How can I Move a Domain/Product to Another Verpex Account","href":"/domains/how-can-i-move-a-domainproduct-to-another-verpex-account"},{"title":"How can I Renew my Domain with Verpex?","href":"/domains/how-can-i-renew-my-domain-with-verpex"},{"title":"How can I set Nameservers on my Domain?","href":"/domains/how-can-i-set-nameservers-on-my-domain"},{"title":"How can I Transfer my Domain to Verpex?","href":"/domains/how-can-i-transfer-my-domain-to-verpex"},{"title":"How can I Update the Contact Information on my Domain?","href":"/domains/how-can-i-update-the-contact-information-on-my-domain"},{"title":"How do I Cancel my Domain Name Registration?","href":"/domains/how-do-i-cancel-my-domain-name-registration"},{"title":"ICANN Registration Data Policy changes","href":"/domains/icann-registration-data-policy-changes"},{"title":"Premium Domain Names","href":"/domains/premium-domain-names"},{"title":"Why do Different TLDs have Different Prices?","href":"/domains/why-do-different-tlds-have-different-prices"},{"group":"Cloudflare \u0026 CDN","pages":[{"title":"How can I use Cloudflare on my Domain?","href":"/domains/how-can-i-use-cloudflare-on-my-domain"},{"title":"Cloudflare SSL Configuration and Flexible/Strict Mode (which to use)","href":"/domains/cloudflare-ssl-configuration-and-flexiblestrict-mode-which-to-use"},{"title":"How to Flush the Cloudflare Cache","href":"/domains/how-to-flush-the-cloudflare-cache"},{"title":"What is a CDN?","href":"/domains/what-is-a-cdn"}]},{"group":".NG Domains","pages":[{"title":"Overview of .NG Domain","href":"/domains/overview-of-ng-domain"},{"title":"Criteria for Registering a .net.ng Domain Name","href":"/domains/criteria-for-registering-a-netng-domain-name"},{"title":"Criteria for Registering a .sch.ng Domain Name","href":"/domains/criteria-for-registering-a-schng-domain-name"},{"title":"Criteria for Registering .edu.ng Domain Name","href":"/domains/criteria-for-registering-edung-domain-name"},{"title":"Criteria for Registering .gov.ng Domain","href":"/domains/criteria-for-registering-govng-domain"},{"title":"Domain transfer for .NG","href":"/domains/domain-transfer-for-ng"},{"title":"How to Register a .NG domain","href":"/domains/how-to-register-a-ng-domain"},{"title":"Lifecycle of a .NG Domain","href":"/domains/lifecycle-of-a-ng-domain"},{"title":".NG Domain Status","href":"/domains/ng-domain-status"},{"title":".NG Restricted Domains","href":"/domains/ng-restricted-domains"},{"title":"Types of .NG Domains","href":"/domains/types-of-ng-domains"},{"title":"What you Need to Know Before Registering a .NG Domain","href":"/domains/what-you-need-to-know-before-registering-a-ng-domain"}]},{"title":"Accessing your web site before DNS propagation is complete","href":"/domains/accessing-your-website-before-DNS-propagation"}]},{"group":"cPanel Web Hosting","icon":"server","pages":[{"title":"cPanel Hosting Overview","href":"/cpanel/cpanel-hosting-overview"},{"title":"Hosting with Verpex: What to Expect","href":"/cpanel/hosting-with-verpex-what-you-should-expect"},{"title":"Charity Hosting","href":"/cpanel/charity-hosting"},{"title":"How many Visitors can your Hosting Support?","href":"/cpanel/how-many-visitors-can-your-hosting-support"},{"title":"What is Bandwidth?","href":"/cpanel/what-is-bandwidth"},{"group":"Upgrades \u0026 Plan Changes","pages":[{"title":"How to Upgrade Your Hosting Plan","href":"/cpanel/how-do-i-upgrade-my-hosting-account"},{"title":"Can I Switch to Another Hosting Plan?","href":"/cpanel/can-i-switch-to-another-hosting-plan"},{"title":"Is There Downtime When Changing Hosting Plans?","href":"/cpanel/when-i-change-between-hosting-plans-is-there-any-downtime"}]},{"group":"Account, Access \u0026 Settings","pages":[{"title":"How to Access cPanel","href":"/cpanel/how-to-access-cpanel"},{"title":"How to Change Your cPanel Password","href":"/cpanel/how-to-change-your-cpanel-password"},{"title":"How to Change your cPanel Password from Client Area","href":"/cpanel/how-to-change-your-cpanel-password-from-client-area"},{"title":"How to use User Manager in cPanel","href":"/cpanel/how-to-use-user-manager-in-cpanel"},{"title":"How can I give Access to my Developer?","href":"/cpanel/how-can-i-give-access-to-my-developer"},{"title":"How to Change Your cPanel Language","href":"/cpanel/how-to-change-your-cpanel-language"},{"title":"How to Change Your Time Zone in cPanel","href":"/cpanel/how-to-change-your-time-zone-in-cpanel"},{"title":"How to check CPU \u0026 RAM usage","href":"/cpanel/how-to-check-cpu-ram-usage"}]},{"group":"PHP Settings","pages":[{"title":"How to Change Your PHP Version In cPanel","href":"/cpanel/how-to-change-your-php-version-in-cpanel"},{"title":"How to Increase Your PHP Maximum Execution Time","href":"/cpanel/how-to-increase-your-php-maximum-execution-time"},{"title":"How to Increase your PHP Memory limit","href":"/cpanel/how-to-increase-your-php-memory-limit"},{"title":"How to run a Different PHP Version in the Subdomain/Addon Domain","href":"/cpanel/how-to-run-a-different-php-version-in-the-subdomainaddon-domain"}]},{"group":"FTP \u0026 File Management","pages":[{"title":"How to Create an FTP Account","href":"/cpanel/how-to-create-an-ftp-account"},{"title":"Using FTP","href":"/cpanel/using-ftp"},{"title":"Managing Files in cPanel","href":"/cpanel/managing-files-in-cpanel"},{"title":"Managing Disk Usage","href":"/cpanel/managing-disk-usage"},{"title":"Maximum Upload Filesize and how to Increase it","href":"/cpanel/maximum-upload-filesize-and-how-to-increase-it"},{"title":"How to Configure and Manage WebDAV Web Disks With cPanel","href":"/cpanel/how-to-configure-and-manage-webdav-web-disks-with-cpanel"}]},{"group":"Domains \u0026 DNS in cPanel","pages":[{"title":"Managing Domains in cPanel","href":"/cpanel/managing-websites-in-cpanel"},{"title":"Addon Domain","href":"/cpanel/addon-domain"},{"title":"Aliases vs. Redirects","href":"/cpanel/aliases-vs-redirects"},{"title":"Can I add addon domains without changing DNS?","href":"/cpanel/can-i-add-addon-domains-without-changing-dns"},{"title":"Do we Support Wildcard Subdomains","href":"/cpanel/do-we-support-wildcard-subdomains"},{"title":"How Long Does DNS Take to Propagate","href":"/cpanel/how-long-does-dns-take-to-propagate"},{"title":"How to Edit Your DNS Records with Verpex","href":"/cpanel/how-to-edit-your-dns-records-with-verpex"},{"title":"How to Forward a Domain","href":"/cpanel/how-to-forward-a-domain"},{"title":"How to Remove an Addon Domain","href":"/cpanel/how-to-remove-an-addon-domain"},{"title":"Running Multiple Websites","href":"/cpanel/running-multiple-websites"},{"title":"Subdomains","href":"/cpanel/sub-domains"},{"title":"What Nameservers Should I use for an Addon?","href":"/cpanel/what-nameservers-should-i-use-for-an-addon"},{"title":"Types of DNS Records","href":"/cpanel/types-of-dns-reords"}]},{"group":"Troubleshooting \u0026 Errors","pages":[{"title":"My Website Is Down — What Can I Do?","href":"/cpanel/my-website-is-down-what-can-i-do"},{"title":"My Hosting is Suspended will my Emails work?","href":"/cpanel/my-hosting-is-suspended-will-my-emails-work"},{"title":"Your Hosting Account has been Compromised","href":"/cpanel/your-hosting-account-has-been-compromised"},{"title":"Fixing a 404 Not Found Error","href":"/cpanel/404-error-resource-error"},{"title":"Fixing a 500 Internal Server Error","href":"/cpanel/500-internal-server-error-and-how-to-fix-it"},{"title":"Fixing a 503 Service Unavailable Error","href":"/cpanel/503-error-and-how-to-resolve"},{"title":"Fixing a 504 Gateway Timeout Error","href":"/cpanel/504-error-server-is-unavailable"},{"title":"Fixing a 508 Resource Limit Reached Error","href":"/cpanel/508-error-resource-limit-is-reached"},{"title":"How to Fix a Contact Form That Isn't Working","href":"/cpanel/how-to-fix-contact-form-not-working"},{"title":"My Website has been Compromised","href":"/cpanel/my-website-has-been-compromised"}]},{"group":"Databases","pages":[{"title":"MySQL Databases","href":"/cpanel/mysql-databases"},{"title":"Choosing Between VARCHAR and TEXT in MySQL","href":"/cpanel/choosing-between-varchar-and-text-in-mysql"},{"title":"Creating MySQL Databases and Users","href":"/cpanel/creating-mysql-databases-and-users"},{"title":"Database Privileges","href":"/cpanel/database-privileges"},{"title":"How to Create Separate Database Access","href":"/cpanel/how-to-create-separate-database-access"},{"title":"Remote Database Connections","href":"/cpanel/remote-database-connections"},{"title":"SQLite","href":"/cpanel/sqlite"},{"title":"Two Easy Ways to Export and Import MySQL Databases","href":"/cpanel/two-easy-ways-to-export-and-import-mysql-databases"},{"title":"Using a MySQL Database Remotely with cPanel","href":"/cpanel/using-a-mysql-database-remotely-with-cpanel"},{"title":"Using phpMyAdmin","href":"/cpanel/using-phpmyadmin"},{"title":"What Databases do we Provide?","href":"/cpanel/what-databases-do-we-provide"}]},{"group":"Software \u0026 Development","pages":[{"title":"Software","href":"/cpanel/software"},{"title":"How to Create a phpinfo","href":"/cpanel/how-to-create-a-phpinfo"},{"title":"How To Install Ruby Gems in cPanel","href":"/cpanel/how-to-install-ruby-gems-in-cpanel"},{"title":"How to Use the Softaculous Autoinstaller","href":"/cpanel/how-to-use-the-softaculous-autoinstaller"},{"title":"Python Applications","href":"/cpanel/python-applications"},{"title":"Setting Timezones in PHP","href":"/cpanel/setting-timezones-in-php"},{"title":"Using NodeJS Apps","href":"/cpanel/using-nodejs-apps"},{"title":"Creating a Node.js application with the Node.js Selector","href":"/cpanel/create-application-with-nodejs-selector"},{"title":"How To Setup Node.js App in cPanel","href":"/cpanel/how-to-setup-nodejs-app-in-cpanel"},{"title":"FFMPEG Support","href":"/cpanel/ffmpeg-support"},{"title":"Understanding Cron Jobs","href":"/cpanel/understanding-cron-jobs"},{"title":"How to use the cPanel Terminal","href":"/cpanel/how-to-use-the-cpanel-terminal"},{"title":"Secure Shell (SSH) Overview","href":"/cpanel/secure-shell-ssh-overview"}]},{"group":"SSL Certificates","pages":[{"title":"SSL Certificates","href":"/cpanel/ssl-certificates"},{"title":"How to Remove SSL From cPanel","href":"/cpanel/how-to-uninstall-ssl"},{"title":"How to Force SSL","href":"/cpanel/how-to-force-ssl"}]},{"group":"Backups \u0026 Restore","pages":[{"title":"Creating a Full cPanel Backup","href":"/cpanel/cpanel-backup"},{"title":"Backing up and restoring your data using Backuply","href":"/cpanel/backing-up-and-restoring-your-data-using-backuply"},{"title":"How to Restore Your Website","href":"/cpanel/how-to-restore-your-website"}]},{"group":"Website Essentials","pages":[{"title":"How to Create an Index Page","href":"/cpanel/how-to-create-an-index-page"},{"title":"How to change your default Index page in .htaccess","href":"/cpanel/how-to-change-your-default-index-page-in-htaccess"},{"title":"How to Create an 'Under Construction' Page in cPanel","href":"/cpanel/how-to-create-an-under-construction-page-in-cpanel"},{"title":"How to add Google Analytics to your Site","href":"/cpanel/how-to-add-google-analytics-to-your-site"}]}]},{"group":"WordPress","icon":{"style":"brands","name":"wordpress","library":"fontawesome"},"pages":[{"title":"How to Log in to WordPress","href":"/wordpress/how-to-log-in-to-wordpress"},{"title":"How to Create a Cookie-Free Domain for WordPress","href":"/wordpress/3-how-to-create-a-cookie-free-domain-for-wordpress"},{"title":"How do I Upload a Project to cPanel using WP Toolkit","href":"/wordpress/how-do-i-upload-a-project-to-cpanel-using-wp-toolkit"},{"title":"How to Change cPanel Domain Through Your WHM","href":"/wordpress/how-to-change-cpanel-domain-through-your-whm"},{"title":"How to Change WordPress Admin URL","href":"/wordpress/how-to-change-wordpress-admin-url"},{"title":"How to Change WordPress Site Address (URL)","href":"/wordpress/how-to-change-wordpress-site-address-url"},{"title":"How to create a WordPress staging site with cPanel","href":"/wordpress/how-to-create-a-wordpress-staging-site-with-cpanel"},{"title":"How to Debug WordPress® with cPanel and WordPress Toolkit?","href":"/wordpress/how-to-debug-wordpress-with-cpanel-and-wordpress-toolkit"},{"title":"How to Edit My WordPress Website in cPanel Using WP Toolkit","href":"/wordpress/how-to-edit-my-wordpress-website-in-cpanel-using-wp-toolkit"},{"title":"How to improve WordPress Website Security with these Tips?","href":"/wordpress/how-to-improve-wordpress-website-security-with-these-tips"},{"title":"How to Increase WordPress Memory Limit","href":"/wordpress/how-to-increase-wordpress-memory-limit"},{"title":"How to Reset WordPress Password","href":"/wordpress/how-to-reset-wordpress-password"},{"title":"Manually Installing Software","href":"/wordpress/manually-installing-software"},{"title":"What’s the Difference Between Managed WordPress Hosting and Cloud Web Hosting?","href":"/wordpress/whats-the-difference-between-managed-wordpress-hosting-and-cloud-web-hosting"},{"title":"Fixing the White Screen of Death (WSOD)","href":"/wordpress/white-screen-of-deathwsod"},{"title":"WP Toolkit Lite vs WP Toolkit Deluxe: A Feature Comparison","href":"/wordpress/wp-toolkit-lite-vs-wp-toolkit-deluxe-a-feature-comparison"},{"title":"XML-RPC, What it is and how you can Enable/Disable it","href":"/wordpress/xml-rpc-what-it-is-and-how-you-can-enabledisable-it"},{"group":"Themes","pages":[{"title":"How to Install a WordPress Theme","href":"/wordpress/how-to-install-a-theme"},{"title":"How to Upgrade WordPress Theme","href":"/wordpress/how-to-upgrade-wordpress-theme"}]},{"group":"Plugins","pages":[{"title":"How to Install a WordPress Plugin.","href":"/wordpress/how-to-install-a-wordpress-plugin"},{"title":"How to Upgrade a WordPress Plugin","href":"/wordpress/how-to-upgrade-a-wordpress-plugin"}]},{"group":"Installing WordPress","pages":[{"title":"Installing WordPress","href":"/wordpress/installing-wordpress"},{"title":"How to Delete a WordPress site","href":"/wordpress/how-to-delete-a-wordpress-site"},{"title":"How to Upgrade a WordPress version","href":"/wordpress/how-to-upgrade-a-wordpress-version"},{"title":"How to Upload Files in WordPress","href":"/wordpress/how-to-upload-files-in-wordpress"}]},{"group":"WP-CLI","pages":[{"title":"Using WP-CLI on WordPress","href":"/wordpress/using-wp-cli-on-wordpress"},{"title":"Changing WordPress Site URL using WP-CLI","href":"/wordpress/changing-wordpress-site-url-using-wp-cli"},{"title":"How to Install WordPress via WP-CLI","href":"/wordpress/how-to-install-wordpress-via-wp-cli"},{"title":"How to Use the WP-CLI to Manage Your WordPress Site","href":"/wordpress/how-to-use-the-wp-cli-to-manage-your-wordpress-site"}]}]},{"group":"Emails","icon":"envelope","pages":[{"title":"Email Overview","description":null,"href":"/emails/email-overview"},{"title":"Configuring Autoresponder for your Email Account","href":"/emails/configuring-autoresponder-for-your-email-account"},{"title":"Email Limits","description":null,"href":"/emails/email-limits"},{"title":"Email Troubleshooting","href":"/emails/email-troubleshooting"},{"title":"Local and Remote Mail Exchanger in cPanel","href":"/emails/local-and-remote-mail-exchanger-in-cpanel"},{"title":"MIME Format Emails","href":"/emails/mime-format-emails"},{"title":"Setting up Google MX Records from your cPanel","href":"/emails/setting-up-google-mx-records-from-your-cpanel"},{"title":"Spam Filtering Customisation","href":"/emails/spam-filtering-customisation"},{"title":"What is the Limit on the Email Attachment Size?","href":"/emails/what-is-the-limit-on-the-email-attachment-size"},{"title":"Why Does My Mailbox Get Full?","href":"/emails/why-does-my-mailbox-get-full"},{"group":"Managing Email Accounts","pages":[{"title":"Managing Email Accounts","href":"/emails/email-accounts"},{"title":"Creating An Email Account on Your cPanel Hosting","href":"/emails/creating-an-email-account-on-your-cpanel-hosting"},{"title":"Email Forwarding in cPanel","href":"/emails/email-forwarding-in-cpanel"},{"title":"How to Delete an Email Account in cPanel","href":"/emails/how-to-delete-an-email-account-in-cpanel"}]},{"group":"Email Clients \u0026 Devices","pages":[{"title":"Configuring an Email Client","href":"/emails/configuring-an-email-client"},{"title":"How to Set Up Webmail in Outlook","href":"/emails/how-to-setup-webmail-on-outlook"},{"title":"Setup Email Accounts on iPhone","href":"/emails/setup-email-accounts-on-iphone"},{"title":"Using Gmail with your Verpex Web Hosting","href":"/emails/using-gmail-with-your-verpex-web-hosting"},{"title":"Synchronizing cPanel® Calendar, Contacts, and Email on Android with ActiveSync","href":"/emails/synchronizing-cpanel-calendar-contacts-and-email-on-android-with-activesync"},{"title":"Outlook 365 Auto Archive Setup","href":"/emails/outlook-365-auto-archive-setup"},{"title":"How to Set Up SMTP in cPanel","href":"/emails/how-to-set-up-smtp-in-cpanel"}]},{"group":"Webmail","pages":[{"title":"How to Change your Webmail Password in cPanel","href":"/emails/how-to-change-cpanel-webmail-password"},{"title":"How to Change the Time Zone in Webmail","href":"/emails/how-to-change-the-time-zone-in-webmail"},{"title":"How Folder Subscription Works","href":"/emails/how-folder-subscription-works"}]},{"group":"Email Backups \u0026 Transfers","pages":[{"title":"Backing Up and Restoring Emails in Webmail (Roundcube \u0026 Horde)","href":"/emails/how-to-back-up-and-restore-emails-in-cpanel-webmailroundcube-and-horde"},{"title":"How to Backup Emails in Mail Clients","href":"/emails/how-to-backup-emails-in-mail-clients"},{"title":"How to Transfer in IMAP Emails Using an IMAP Transfer Tool","href":"/emails/how-to-transfer-in-imap-emails-using-an-imap-transfer-tool"}]}]},{"group":"Building Websites on Verpex","icon":"hammer","pages":[{"title":"How to Preview Your Website on Our Servers","href":"/building/how-to-preview-your-website-on-our-servers"},{"group":"SitePad Website Builder","pages":[{"title":"Building Website with Sitepad","href":"/building/building-website-with-sitepad"},{"title":"Clone a SitePad Website Builder Page","href":"/building/clone-a-sitepad-website-builder-page"},{"title":"Edit a SitePad Website Builder Page","href":"/building/edit-a-sitepad-website-builder-page"}]},{"group":"Performance","pages":[{"title":"How to Boost Your Hosting Performance","href":"/building/how-to-boost-your-hosting-performance"},{"title":"Brotli Compression","href":"/building/brotli-compression"}]}]},{"group":"Reseller Hosting","icon":"users","pages":[{"title":"Getting Started As a Reseller","href":"/reseller/getting-started-as-a-reseller"},{"title":"Can I oversell on my Reseller Plan?","href":"/reseller/can-i-oversell-on-my-reseller-plan"},{"title":"Difference Between cPanel and WHM","href":"/reseller/difference-between-cpanel-and-whm"},{"title":"Difference Between Managed Cloud Server and Reseller Hosting","href":"/reseller/difference-between-managed-cloud-server-and-reseller-hosting"},{"title":"How to Grant Shell/Terminal Access as a reseller","href":"/reseller/how-to-grant-shellterminal-access-as-a-reseller"},{"title":"How to Link WHM Account to WHMCS","href":"/reseller/how-to-link-whm-account-to-whmcs"},{"title":"How to Set Up Custom Nameservers","href":"/reseller/how-to-set-up-custom-nameservers"},{"title":"Is Reseller Hosting White-Label?","href":"/reseller/is-reseller-hosting-whitelabel"},{"title":"Reseller Hosting Server Specification","href":"/reseller/reseller-hosting-server-specification"},{"group":"Managing Clients and Orders","pages":[{"title":"Managing Clients and Orders","href":"/reseller/managing-clients-and-orders"},{"title":"How to bill my customers","href":"/reseller/how-to-bill-my-customers"},{"title":"Linking my WHM account to Upmind","href":"/reseller/linking-my-whm-account-to-upmind"}]},{"group":"Using Web Host Manager (WHM)","pages":[{"title":"Using Web Host Manager (WHM)","href":"/reseller/using-web-host-manager-whm"},{"title":"Can resellers set their own LVE Limits?","href":"/reseller/can-resellers-set-their-own-lve-limits"},{"title":"How to Brand Your cPanel Reseller Hosting?","href":"/reseller/how-to-brand-your-cpanel-reseller-hosting"},{"title":"How to change a cPanel password in WHM","href":"/reseller/how-to-change-a-cpanel-password-in-whm"},{"title":"How to create and manage cPanel accounts in WHM","href":"/reseller/how-to-create-and-manage-cpanel-accounts-in-whm"},{"title":"How to create packages and feature lists in WHM","href":"/reseller/how-to-create-packages-and-feature-lists-in-whm"},{"title":"How to Delete a cPanel Account in WHM","href":"/reseller/how-to-delete-a-cpanel-account-in-whm"},{"title":"How to upgrade and downgrade packages in WHM","href":"/reseller/how-to-upgrade-and-downgrade-packages-in-whm"}]}]},{"group":"Enhance Control Panel","icon":"gauge","pages":[{"title":"From cPanel to Enhance: Everything You Need to Know","href":"/enhance/from-cpanel-to-enhance-everything-you-need-to-know"},{"title":"Enhance Reseller Hosting FAQ","href":"/enhance/enhance-reseller-hosting-frequently-asked-questions"},{"title":"Adding a New Customer to Your Enhance Reseller Account","href":"/enhance/adding-a-new-customer-to-your-enhance-resellers-account"},{"title":"Managing Your Website, Databases, and Backups in Enhance","href":"/enhance/managing-your-website-databases-and-backups-in-enhance"},{"title":"Managing Your WordPress Site in Enhance","href":"/enhance/managing-your-wordpress-site-in-enhance"},{"title":"Installing an SSL Certificate in Enhance","href":"/enhance/installing-an-ssl-certificate-in-enhance"},{"title":"Managing Your Domains in Enhance","href":"/enhance/managing-your-domains-in-enhance"},{"title":"Managing Your Email in Enhance","href":"/enhance/managing-your-email-in-enhance"},{"title":"Using the File Manager in Enhance","href":"/enhance/using-the-file-manager-in-enhance"},{"title":"Managing Backups in Enhance","href":"/enhance/managing-backups-in-enhance"},{"title":"Managing Your MySQL Databases in Enhance","href":"/enhance/managing-your-mysql-databases-in-enhance"},{"title":"Managing FTP Accounts in Enhance","href":"/enhance/managing-ftp-accounts-in-enhance"},{"title":"Changing PHP Versions and Settings in Enhance","href":"/enhance/changing-php-versions-and-settings-in-enhance"},{"title":"Configuring SSH Access in Enhance","href":"/enhance/configuring-ssh-access-in-enhance"},{"title":"How to Deploy a Node.js Application on Enhance","href":"/enhance/how-to-deploy-a-nodejs-application-on-enhance"},{"title":"Enhance Reseller: Managing Customers from the Panel","href":"/enhance/enhance-reseller-managing-customers-from-the-panel"},{"title":"Importing and Restoring a cPanel Account into Enhance","href":"/importing-and-restoring-a-cPanel-account-into-enhance"}]},{"group":"Self-Managed Servers","icon":"screwdriver-wrench","pages":[{"title":"Using the Get Connection Button When You Can't Access Your Server","href":"/servers/how-to-use-the-get-connection-button-when-you-cannot-access-your-server"},{"title":"OpenClaw Guide","href":"/servers/openclaw-guide"},{"title":"How to Reset the Root Password for Your Self-Managed Server","href":"/servers/how-to-reset-the-root-password-for-your-self-managed-server"}]},{"group":"Network and Technology","icon":"network-wired","pages":[{"group":"Our Platform \u0026 Limits","pages":[{"title":"HTTP/2: A Broad Outline","href":"/cpanel/a-broad-outline-of-http-2"},{"title":"Hardware and Locations","href":"/network/server-overview"},{"title":"What is the Average Server Specification?","href":"/network/what-is-the-average-server-specification"},{"title":"Software Stack","href":"/network/web-hosting-software-stack"},{"title":"Why Hosting Location Matters","href":"/network/why-hosting-location-matters"},{"title":"CloudLinux Limits","href":"/network/cloudlinux-limits"},{"title":"LVE Limits Explained","href":"/network/lve-limits-explained"},{"title":"Disk Space Limits","href":"/network/disk-space-limits"},{"title":"Firewall IP Block","href":"/network/firewall-ip-block"},{"title":"HTTP 2 Overview","href":"/network/http-2-overview"},{"title":"Can we Enable Litespeed Crawler?","href":"/network/can-we-enable-litespeed-crawler"},{"title":"Can I Livestream Audio or Video?","href":"/network/can-i-livestream-audio-or-video"}]},{"group":"Tools \u0026 Troubleshooting","pages":[{"title":"How to Clear your Browser Cache","href":"/network/how-to-clear-your-browser-cache"},{"title":"What is a 403 Forbidden Error (and How Can I Fix It)?","href":"/network/what-is-a-403-forbidden-error-and-how-can-i-fix-it"},{"title":"How to Fix the “Deceptive Site Ahead” Warning","href":"/network/how-to-fix-the-deceptive-site-ahead"},{"title":"How to do Traceroute from a Windows Machine","href":"/network/how-to-do-traceroute-from-a-windows-machine"},{"title":"How to Perform MTR","href":"/network/how-to-perform-mtr"},{"title":"How to Edit Your Hosts File on Windows, Mac, or Linux","href":"/network/how-to-edit-your-hosts-file-on-windows-mac-or-linux"},{"title":"Connecting Notepad++ to your hosting account via an FTP connection","href":"/network/connecting-notepad-to-your-hosting-account-via-an-ftp-connection"},{"title":"Changing the Document Root Directory","href":"/network/changing-the-document-root-directory"},{"title":"How To Clone A Website In cPanel","href":"/network/how-to-clone-a-website-in-cpanel"},{"title":"How to Host Git Repositories with cPanel","href":"/network/how-to-host-git-repositories-with-cpanel"},{"title":"How to Host Dynamic DNS Domains with cPanel","href":"/network/how-to-host-dynamic-dns-domains-with-cpanel"}]}]},{"group":"Security","icon":"shield","pages":[{"title":"Protecting Yourself from Email Phishing Scams","href":"/security/protecting-yourself-from-email-phishing-scam-attempts"},{"title":"Email Spoofing","href":"/security/email-spoofing"},{"title":"Choosing a Strong Password","href":"/security/choosing-a-strong-password"},{"title":"Securing a Hacked Site","href":"/security/securing-a-hacked-site"},{"title":"Preventing Outgoing Email from Being Marked as Spam","href":"/security/preventing-outgoing-e-mail-from-being-marked-as-spam"},{"title":"WordPress Security","href":"/security/wordpress-security"},{"title":"How to Secure an Unmanaged Server","href":"/security/how-to-secure-an-unmanaged-server"},{"title":"How to Generate Google reCAPTCHA Keys for Site Security","href":"/security/how-to-generate-google-recaptcha-keys-for-site-security"}]},{"title":"Verpex Knowledgebase","hidden":true,"href":"/index"}]},"title":"Configuring Autoresponder for your Email Account - Verpex","buildId":"dpl_CUnGQP1HgFUzoxatVC37y4zP83Vx","deploymentId":"dpl_CUnGQP1HgFUzoxatVC37y4zP83Vx","dynamics":["07c022d89b","a74be98ba7"],"chunks":["Frame-BCFzRGe_.js","DynamicMarkdown-BUuAYxJE.js","zoom-image-lightbox-DQ5W4Q2v.js","PlusIcon-jZ8vgk6R.js","lightbox-handle-r17bVUz3.js"]}